
A gas grill that lights unevenly, leaves cold zones, or produces weak yellow flames is often telling you the burners are near the end. This gas grill burner replacement guide focuses on the part that matters most: buying burners that actually fit, installing them safely, and avoiding a repair that solves nothing.
Burners are wear items. Heat, grease, moisture, and cleaning chemicals eventually corrode the metal and clog the ports. Replacing them can restore a capable grill for a fraction of the cost of a new one. But it only makes sense when the firebox, valves, and cooking grates are still worth keeping.
Confirm the burners are the problem
Do not order parts just because the grill has weak heat. A dirty burner can behave much like a failed one, and a regulator problem can make every burner seem underpowered.
Start with the grill cold and the gas supply off. Remove the grates, heat diffusers, and burners if accessible. Look for cracks, pinholes, split seams, heavy rust scale, and damaged burner ports. A burner with holes along its side is not repairable. It should be replaced.
Surface rust alone is less decisive. Stainless burners can discolor badly while remaining structurally sound, while thin stainless or coated steel can corrode from the inside out. Press lightly around questionable areas. If the metal flakes away, flexes, or has a visible split, it is done.
Clogged ports are different. Spiders and insects commonly build nests in burner tubes, especially when a grill sits unused. Grease and carbon can also block the flame ports. Brush the outside of the burner with a soft wire brush, clear ports carefully with a small pick or paper clip, and clean the tube with a venturi brush. Do not enlarge the ports. Larger holes change the gas and air mix and create uneven flames.
If all burners are weak after cleaning, check the regulator before spending money on replacement burners. On a propane grill, shutting off the tank, turning every control knob off, reconnecting the tank slowly, and reopening it slowly can reset a regulator that has tripped into low-flow mode. If the issue remains, the regulator, hose, valves, or gas supply may be the real problem.
Measure before you shop
Brand names and grill model numbers are useful, but measurements decide whether a burner fits. Manufacturers revise grills, reuse model names, and discontinue original parts. A listing that says it fits your brand is not enough.
Remove one old burner and measure its overall length from the end that sits over the valve to the far mounting end. Then note the tube shape, width, port placement, mounting tabs, carryover tube locations, and the size and position of the venturi opening. Take clear photos before disassembly. They are more useful than a vague memory when comparing replacement listings.
The burner must sit correctly over the valve orifice. That small brass fitting delivers gas into the burner tube. If the tube does not align with it, the grill may fail to ignite, burn poorly, or release gas where it should not. A burner that is close in length but wrong at the valve end is not close enough.
For an OEM replacement, verify the exact model number from the data plate, usually located on the cart, firebox, or inside a cabinet door. For aftermarket burners, compare every critical dimension against the product diagram. Adjustable universal burners can work on basic grills, but they bring trade-offs. Their seams and extensions may be less durable, and their port layout may not match the original heat pattern. They are a practical fix for an older budget grill, not automatically the best long-term choice.
Choose material for the grill you own
Replacement burner material affects service life, but thicker metal and better construction matter more than a marketing label.
Aluminized steel burners are generally the lowest-cost option. They can perform well in a protected grill that is covered and cleaned regularly, but they eventually rust. Plain stainless burners resist corrosion better, though very thin stainless can still warp or burn through.
Cast stainless burners tend to be heavier and more durable, with substantial walls that hold up better under repeated high-heat cooking. They are often worth the added cost on a grill with a solid firebox and good grates. Cast iron burners are less common and need more attention because rust can become a problem quickly.
Do not pay premium burner money to revive a grill with a rotted firebox, damaged valves, or a cabinet that is structurally failing. A burner replacement is good maintenance when it extends the life of a sound grill. It is bad spending when it becomes the first of several expensive repairs.
How to replace gas grill burners safely
Work outdoors on a cool grill. Turn all control knobs off, close the propane tank valve or natural gas shutoff, and disconnect the fuel source. Keep ignition sources away from the work area.
Take photos of the burner layout, electrode positions, carryover tubes, and retaining clips. Many grills look simple once opened, but small brackets and ignition wires are easy to reinstall incorrectly.
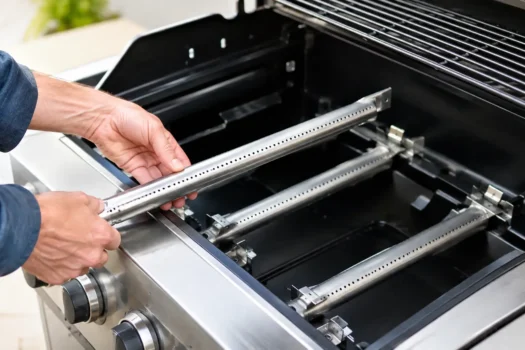
Remove the cooking grates and heat diffusers, then lift out the old burners after releasing any screws, cotter pins, or retaining clips. If a screw is rusted solid, use penetrating oil and patience. Forcing it can snap a mounting tab or damage the firebox. In some cases, drilling out a seized screw is reasonable. In others, especially on a badly corroded grill, it is a sign to reconsider the repair.
Clean the firebox before installing anything new. Scrape loose grease and carbon into the grease tray, clear debris from the burner supports, and inspect the valve orifices for blockage. Do not poke wire into the brass orifices or drill them. Their opening is precisely sized for the grill’s fuel system.
Set each new burner in place, making sure the venturi tube fully surrounds or aligns with the valve orifice without forcing it. Reinstall carryover tubes, clips, screws, and igniter electrodes in their original positions. The burners should sit level and stable. If they rock, bind against the firebox, or miss the mounting points, stop. Something is wrong with the fit.
Test for leaks and flame quality
Reconnect the gas supply with all burner knobs off. Mix dish soap with water and brush the solution onto the tank connection, hose fittings, regulator connection, and any fittings disturbed during the repair. Open the fuel supply slowly. Growing bubbles indicate a leak. Shut the gas off immediately and correct the connection before lighting the grill. Never test for leaks with a match or lighter.
Once the leak test is clear, light the grill according to its manual. Start with one burner, then light the remaining burners. After a few minutes, look for mostly blue flames with small yellow tips. Flames should travel evenly across the ports and carryover smoothly from one burner to the next.
Large yellow flames, popping, flames lifting away from the ports, or a strong gas smell mean the job is not finished. Shut the grill down and check burner alignment, blocked ports, venturi obstructions, and the correct placement of heat diffusers. Do not keep cooking on a grill that is burning abnormally.
Make the new burners last longer
Burner life comes down to moisture, grease, and neglect. Let the grill cool after cooking, then brush the grates and empty the grease tray before buildup becomes a fire hazard. Periodically remove the grates and diffusers to clear grease from the firebox and inspect the burner ports.
A cover helps keep rain out, but it is not a substitute for ventilation or cleaning. Put a cover on only after the grill has cooled and dried. In humid climates, trapped moisture under a permanently covered grill can speed corrosion. If possible, store the grill where it is protected from direct weather but still gets airflow.
A replacement burner is not a glamorous upgrade, but it can bring back the even heat and dependable ignition that made the grill useful in the first place. Measure carefully, reject questionable fits, and treat abnormal flames as a safety issue rather than a minor annoyance.