 globalgrillguidecom
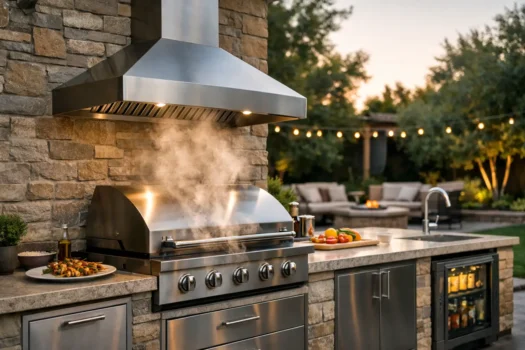
A grill placed in the open air is not the same thing as a grill placed under a roof. That distinction drives nearly every decision in this outdoor kitchen ventilation guide. If smoke can rise freely and move away from the cooking area, you may not need a hood. If it collects under a pavilion, porch roof, pergola, or enclosed ceiling, ventilation stops being an optional upgrade and becomes a safety, comfort, and cleanup issue.
The wrong setup leaves grease on ceilings, smoke in your guests’ faces, and heat trapped around equipment not designed for it. The right setup is less glamorous, but it works: enough capture area, enough airflow, a sensible duct route, and materials that can handle grease and weather.
Start With the Structure, Not the Grill
Homeowners often shop for a grill first and try to fit a hood around it later. That can work, but it is backward. The roof height, wall layout, prevailing wind, and ceiling material determine whether a ventilation system can actually capture smoke and exhaust it safely.
A fully open patio with a freestanding grill usually needs no mechanical ventilation. You still need proper clearances from siding, railings, and overhead materials, but the outdoors does most of the air-moving work.
A covered kitchen is different. A solid roof, low ceiling, rear wall, or side walls can trap heat and smoke even when the front is open. A pergola can be deceptively tricky too. Widely spaced slats allow heat to escape; a dense slat pattern, fabric cover, or polycarbonate roof behaves much more like a ceiling. Do not assume a structure is “open” because it has no walls.
If your cooking area sits under a second-story deck or in a screened porch, slow down. Those spaces have more combustible surfaces, less room for a hood, and fewer safe routes for ductwork. Some installations are possible with the right listed equipment and clearances. Others are a bad fit for live-fire cooking, regardless of how appealing the layout looks.
When an Outdoor Kitchen Needs a Vent Hood
A hood is most useful when it can capture rising heat, grease vapor, and smoke before they spread across the ceiling. That usually means a built-in gas grill beneath a covered roof, especially one with a rear wall or low ceiling. It can also make sense for a griddle, side burner, or pizza oven that produces sustained heat under cover.
Charcoal, wood, and pellet cooking raise the stakes. They create more smoke and particulate matter than a typical gas grill, particularly during startup, searing, and grease flare-ups. A hood that seems adequate for burgers on a gas grill may struggle badly with a charcoal fire or a pellet cooker running at high heat.
A hood is not a cure for a poorly located cooker. If the grill is too close to a wall, mounted below a low combustible ceiling, or exposed to crosswinds that push smoke out of the capture area, more blower power will not fully solve the problem. Capture geometry matters before CFM does.
For many open-sided structures, a properly placed hood is still worthwhile for comfort and ceiling protection. But if your main concern is only occasional smoke drifting across an uncovered patio, spend your money on better grill placement, wind awareness, and clearance management instead of buying a decorative hood that moves little air.
Hood Size and Airflow: Bigger Coverage Beats Big Claims
The hood should extend beyond the cooking surface on both sides and project far enough forward to catch the plume rising from the grill. Exact requirements depend on the hood, grill, fuel type, and local code, so follow the appliance and hood installation instructions. As a practical rule, tight hood-to-grill fits are rarely forgiving. Extra capture area is usually more valuable than a flashy control panel.
CFM, or cubic feet per minute, measures how much air a blower can move. It matters, but it is easy to misuse. A high-CFM blower attached to a small, shallow hood can pull hard without capturing smoke that has already escaped around the edges. Conversely, an oversized canopy with too little airflow can let heat roll out the front.
For covered outdoor kitchens, select a listed hood and blower system intended for the specific application and cooking equipment. Do not rely on generic online CFM formulas as a substitute for manufacturer requirements or local inspection rules. Grill BTU ratings do not tell the entire story because burner layout, hood depth, mounting height, fuel type, and duct length all change real-world performance.
Pay close attention to mounting height. Raise the hood too high and smoke escapes before the blower can grab it. Mount it too low and you lose working room, create head-bump territory, and may violate grill or hood clearance requirements. This is a layout problem best solved on paper before counters, stone, and roofing are installed.
Blower Location Changes the Ownership Experience
An internal blower is simpler to install, but it is usually louder at the cooking station. An in-line or remote blower can reduce noise where you stand, though it adds ducting complexity and may cost more. That trade-off matters if the kitchen is near a seating area. A loud hood gets turned off early, which defeats the reason you installed it.
Choose controls you will actually use with greasy hands and outdoor lighting. Multiple speeds are useful, but only if the lower setting handles ordinary cooking and the high setting is reserved for startup, searing, or smoke-heavy cooks. A system that must run at maximum speed every time may be undersized, poorly positioned, or both.
Ductwork Is Where Good Plans Go Wrong
The blower can only perform as well as the duct path allows. Long runs, sharp elbows, undersized ducting, and restrictive exterior caps all reduce airflow. They also make the system louder because the blower works harder against resistance.
Use the duct size specified by the manufacturer, keep the route as short and straight as practical, and limit unnecessary turns. Smooth metal ducting is generally the right choice for grease-laden exhaust. Flexible duct may be convenient, but its ridges restrict airflow and collect grime. Convenience during installation becomes a cleaning problem later.
Terminate exhaust outdoors, away from doors, operable windows, attic vents, and places where smoke can blow back into the living area. Never dump grill exhaust into an attic, wall cavity, or enclosed soffit. That is not a shortcut. It is a grease, moisture, and fire-risk problem waiting to become expensive.
Outdoor installations also need weather protection. The exterior termination should resist rain intrusion without choking airflow, and exposed duct sections need materials and support appropriate for local conditions. Coastal air, freeze-thaw cycles, and intense sun can punish cheap components faster than expected.
Do Not Ignore Replacement Air
A powerful exhaust system removes air from the covered cooking zone. In a wide-open patio, replacement air is usually easy to find. In a more enclosed lanai, porch, or outdoor room with screens, shades, and partial walls, the system may struggle because there is not enough air entering the space.
Symptoms include weak smoke capture, doors pulling shut, or exhaust recirculating around the hood. The answer may be a larger opening, better placement, or a dedicated makeup-air strategy. It depends on how enclosed the structure is and what local code requires. This is one reason ventilation should be planned with the builder or a qualified installer, not treated as a final accessory.
Grease Management Is the Part Nobody Wants to Maintain
Ventilation does not eliminate grease. It moves grease-laden vapor into baffles, ducts, and collection areas. If those parts are neglected, performance drops and cleanup becomes harder.
Baffle filters are common in outdoor hoods because they are durable and designed to separate grease from the air stream. They still need routine cleaning. How often depends on use: a weekend gas griller may clean them a few times a season, while someone running a griddle, searing frequently, or cooking with wood may need to clean them much more often.
Wipe the hood interior, empty grease cups if your system uses them, and inspect the duct and blower on a regular schedule. Do not wait until grease is visibly dripping. By then, airflow and fire safety have already suffered. If cleaning the filters requires a ladder, awkward disassembly, or removing half the outdoor kitchen, the design was not practical enough.
Common Ventilation Mistakes Worth Avoiding
The most expensive mistake is installing an indoor range hood over an outdoor grill. Indoor hoods are not automatically rated for weather exposure, high heat, or the grease and smoke output of a grill. A cheap hood that looks clean on installation day can become corroded, underpowered, or unsafe long before the grill wears out.
Another common mistake is treating an outdoor-rated hood as permission to ignore clearances. The grill’s manual, hood instructions, building code, and local fire rules all matter. Stone veneer and stainless steel do not make the framing behind them noncombustible.
Finally, do not assume an oversized blower will overcome wind. Strong side winds can push smoke past the hood opening or create downdrafts at the duct termination. If your patio is consistently windy, orient the grill and hood with that reality in mind. A windscreen or layout adjustment may do more than another few hundred CFM.
Before ordering equipment, decide how you actually cook. A covered gas grill used for weeknight dinners needs a different ventilation plan than a wood-fired pizza oven, a charcoal grill, and a griddle running through every football weekend. Build for the smoke, heat, and maintenance you will live with, not the clean rendering you were sold.